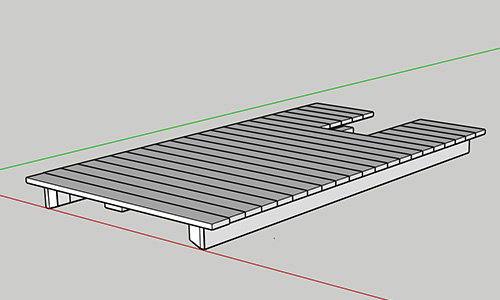
First things first – is building a skoolie roof deck worth it?
YES! When José first proposed building our skoolie roof deck, I poo poo’d the idea. “It’s extra money, extra time, and extra weight!” I said.
I’m so happy he proved me wrong. We love our deck! Building a roof deck is intimidating at first. But it’s not so complicated. It just takes some elbow grease and getting over that fear of heights!
Let’s dive in!
You’ll Need:
- 1(x) 8ft 4×4 pressure treated lumber (for posts)
- 3(x) 8ft 2×6 pressure treated lumber (one will be used for the beam and two for the joists)
- 2×6 pressure treated lumber for decking (amount needed determined by size deck you want)
- Impact driver and drill

- A drill bit set
- 10(x) 2.5″ galvanized steel bolts with washers and nuts (1/2″ diameter)
- 6(x) 4.5″ galvanized steel bolts with washers and nuts (1/2″ diameter)
- 6(x) 4″ galvanized steel bolts with washers and nuts (if you plan to do extensions like we did) (1/2″ diameter)
- Heavy duty steel brackets with 1/2″ diameter holes
- A wrench set
- A 1-in self feed drill bit
- 100% silicone sealant
- 1/8″ or thicker rubber mat (24×24 in should be enough)
- 3 1/2″ deck screws
- An RV ladder (we used the Stromberg Carlson Universal RV Ladder)
- Deck stain and sealer
Full disclosure guys, some of these are affiliate links, so we get a commission if you buy something from the list. As an Amazon Associate we earn from qualifying purchases. Not much, but something. This is really important: we only link to tools and materials we actually used and highly recommend. We do these guides completely for free, so these links are the only way we get a little something back (except for the satisfaction of knowing we helped you build your dream skoolie, of course!)
Don’t have Amazon Prime yet? Here’s a link for 30 days free.
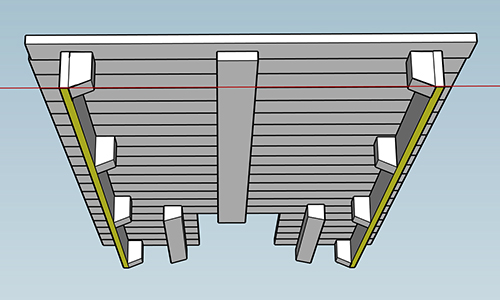
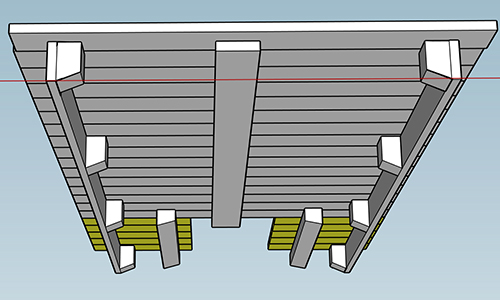
Structure of our Skoolie Roof Deck
Here is the essential structure of our skoolie roof deck. As you can see, we added two small extensions on either side of the hatch. Was it worth it? Yes. The extensions make the deck feel larger and do provide useful extra space.

Step 1: Secure the center beam
- Center the beam on the roof.
- On the beam, mark four evenly spaced locations for bolts. Mark the corresponding location for the bolts on the roof.
- Drill holes in the roof for the beam bolts.
- Use the self feed drill bit to drill four recesses into the beam. The recesses only need to be deep enough for the bolt head to sit just inside the recess.
- Why is this necessary? The decking needs to sit flat on the beam. If there are big bolt heads sticking out of the beam, this won’t be possible. Hence the recesses!
- Bolt down the beam with 2.5″ bolts, sealing liberally with silicone from below.
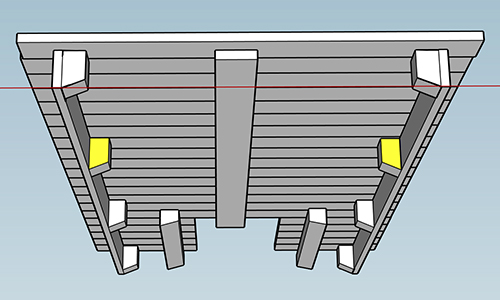
Step 2: Cut four main posts
- Determine the location of the main four posts. We positioned our posts directly on the internal ribbing of the bus. We never placed a post on a section of only sheet metal. You want the weight of the deck to be held by the internal structure of the bus, not its sheet metal roof.
- Balance a 2×6 across the beam. Use this to determine the height of the posts, as well as the angle at which the bottoms need to be cut. Each post will have to be cut custom for its location. See below how to get the angle correct. Essentially, you’ve just got to put the 4×4 against the roof, at an angle. Then balance the 2×6 beam on the midline of the roof, and make sure its level. Then make a mark on the 4×4. Cut along that mark. That little chunk you just cut off your 4×4 is your post! Flip the post upside down. Now the post will be flush with the roof on the bottom, and level on the top!
- When determining and marking position of posts, it’s helpful to temporarily hold the joist in place to make sure the posts line up!

Step 3: Secure the four main posts
- Hold the post in place and determine the location of the bracket. Mark on the roof where a 2.5″ bolt will hold the bracket in place. Drill a hole through the roof for the bolt (the hole will go through the sheet metal right next to the rib).
- Mark on the post where a 4.5″ bolt will hold the bracket in place. Drill a hole all the way through the post for the 4.5″ bolt.
- Secure the bracket to the post using a 4.5″ bolt, then secure the bolt to the roof using a 2.5″ bolt. Use silicone to completely seal the hole in the roof as you secure the bolt.
- Note: In hindsight, we wish we had secured brackets on both sides of the posts, for added strength. We haven’t had any issues with our deck, and we have been in very high winds, so double brackets probably isn’t necessary. It’s just something we wish we had done for that added peace of mind.
Step 4: Secure joists
- Cut your two joists to the desired length of your deck.
- Secure to the posts using deck screws, making sure the top of the joists are flush with the top of the posts.
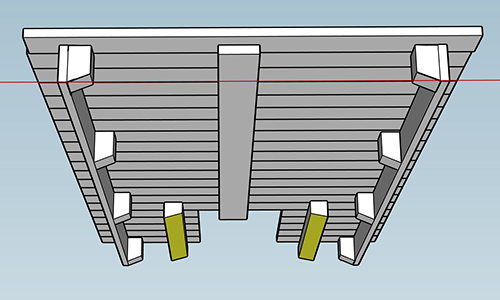
Step 5: Add two extra posts
- Add an extra post halfway along each joist, securing using the same L-bracket method as above.
- Use rubber matting if necessary to make sure the top of the post will be flush with both the joist and the decking.


Step 6: Lay down the decking
- Secure decking to the joists and beam using deck screws (at least three per joint).
- It is helpful to have someone on a ladder next to the bus with a small piece of 2×6 to help make sure each new piece of decking is flush with the last.
Step 7 (optional): Add extra beams for deck extensions
- Cut two 4×4 beams to the length of the extension. How long these are depends on how long you want your deck extension to be.
- Cut the bottom of the beams at an angle to match the curve of the bus.
- Use the self feed drill bit to drill recesses into the beams, just as you did with the main beam.
- Drill holes through the beams and through the roof of the bus for the 4″ bolts.
- Secure the bolts, sealing with silicone just as before.
Step 8 (optional): Add two posts for deck extensions
- Secure two more posts for the extensions.
- Extend the joist out to the posts, securing with deck screws. You can see in our video that we planned to do these extensions from the get-go, so we had the main deck joist extend out past the main deck.
Step 9 (optional): Add extension decking
- Cut decking to size to match the width of your extensions and secure with deck screws.


Step 10: Add a ladder
Note: These instructions are for a Stromberg Carlson Universal RV Ladder.
- Connect the top half of the ladder with the curved handles.
- Fasten the top half of the ladder to the deck. Before you fasten it, make sure you have given the right amount of space between the bus and the ladder standoffs.
- Secure the upper standoffs by first drilling the holes in the bus, then fastening the standoffs with the ladder’s included hardware. Don’t forget to add a little silicone to seal the hole.
- Tip: Thoroughly wipe away any residual silicone that might have squeaked out around the standoffs. No paint will stick to 100% silicone, so if there is any residual silicone around the standoffs, your paint job will look messy (unless you’ve already finished painting of course!) The other option is to use paintable silicone, which is silicone with a little acrylic added to make it paintable.
- Tip: Thoroughly wipe away any residual silicone that might have squeaked out around the standoffs. No paint will stick to 100% silicone, so if there is any residual silicone around the standoffs, your paint job will look messy (unless you’ve already finished painting of course!) The other option is to use paintable silicone, which is silicone with a little acrylic added to make it paintable.
- The back of your bus is not one flat plane. It actually bows out slightly, with two planes meeting at a point. It is at this point that the upper and lower halves of the ladder will meet and be fastened together with a swivel hinge (included in the ladder hardware. Both the upper and lower halves of the ladder have excess railing that need to be cut off. How much needs to be cut off depends entirely on the measurements of your bus.
- Cut the excess railings off the upper and bottom halves of the ladder.
- Determine where the lower half of the ladder will fasten to the bumper and mark where the screws will go.
- DRILL like you’ve never drilled before to make holes for those screws!
- Tip: Those school bus bumbers are NO JOKE. To drill a hole through, you need to have a lot of patience. You will bust drill bits and break screws if you try to go too fast. The trick with drilling through thick steel is to go SLOW. Turn the drill down to the lowest speed and don’t apply too much pressure. The drill will get hot FAST, so give it a break every now and then to cool down.
- Slip the swivel hinge over joint between the upper and lower ladders.
- Secure the bottom of the ladder to the bumper.
- Secure the lower standoffs.
Step 11: Apply a stain/sealant
It’s a really good idea to seal your skoolie roof deck. The weight of wet wood on the back of your rig just equals more diesel and slower hill climbs. Yes, we know the struggle!
You’ll have to allow the deck to dry thoroughly before applying a sealant. Since this is pressure treated wood, it will take some time – at least 2 weeks depending on where you live.
We did our conversion in Florida with almost daily showers. Then our travels took us to lots of wet places. It wasn’t until we spent 5 weeks in the West Texas desert that the deck dried out enough for us to stain it.
<< Back to the Skoolie Conversion Ultimate Guide Homepage

So you’re building a skoolie, huh?
We feel your pain, my friend! We also know how good it feels to finally make a dream reality.
Our skoolie took 9 months and $28,000 to complete. We documented the entire build and are slowly building a series of guides on every step of the bus conversion process.
We spent a crap ton of time figuring out how to do this and that. We also could have saved a few bucks along the way. We hope our tutorials help save you some time and money!
Our TOP 5 Bus Conversion Tools & Materials:
- 5-in-1 Painters Tool (you will use this a MILLION times)
- Impact Driver & Drill Combo Kit (there won’t be a day you won’t use this)
- 100% Silicone (buy in bulk to save a LOT of money!)
- Angle Grinder (get used to using this ALL the time!)
- Table Saw (it will be nearly impossible to complete your conversion without this. It’s WORTH the investment!)
This page contains product affiliate links. We may receive a commission if you make a purchase after clicking on one of these links.