Our Skoolie Solar System Setup & Wiring
We completely understand how intimidating skoolie solar system setups can be. Believe us.
We were so intimidated by solar during our conversion, that we cut corners and installed the wrong type of system (explained in the video).
Please don’t do this. Please take our advice and install a traditional offgrid solar system. It will serve you well in the long run.
Below is a wiring diagram that will be your map as you follow along. The video is very helpful for seeing each step as well!
Let’s dive in!
Liabilty Disclaimer
We are not electricians nor certified solar installation technicians. The steps outlined below are those we took to install our own system. If any of the following terminology or procedures are unfamiliar to you, please learn the basics of electrical or have an certified electrician do the installation for you. We are not held liable for actions taken on your part if you install your solar system without proper knowledge.
Components of our Skoolie Solar System:
- 3000W Renogy Inverter Charger: https://amzn.to/30wc69J
- 40amp Renogy MPPT Charge Controller: https://amzn.to/3bAQ4sJ
- 10AWG Fuse Holder & 40A Fuse: https://amzn.to/3ew9lgS
- 3ft 2/0 AWG Inverter Cables https://amzn.to/3cp0pbI
- 1ft 2AWG Cable: https://amzn.to/3qDcZIh
- ANL Fuse Holder & 300A Fuse: https://amzn.to/3l3jgff
- 8ft 10 AWG Wire Copper Tray Cable – Connect Charge Controller and Battery: https://amzn.to/2PuYMA6
- (5) Expert Power 100Ah LiFePO batteries (get 5% off storewide with the Expert Power code: AWTY)
Extra Tools & Materials Needed for the Install:
- Power Drill: https://amzn.to/3romrj8
- Electrician’s Wire Stripper Tool: https://amzn.to/3lSAJqZ
- Butt splices: https://amzn.to/3tWr6KU
- Tool Set: https://amzn.to/3lSAJqZ
Full disclosure guys, some of these are affiliate links, so we get a commission if you buy something from the list. As an Amazon Associate we earn from qualifying purchases. Not much, but something. This is really important: we only link to tools and materials we actually used and highly recommend. We do these guides completely for free, so these links are the only way we get a little something back (except for the satisfaction of knowing we helped you build your dream skoolie, of course!)
Don’t have Amazon Prime yet? Here’s a link for 30 days free.
Best Batteries for an Offgrid Solar Setup
This video shows our old AGM batteries that we DO NOT RECOMMEND. We highly recommend going lithium. They are more expensive than AGMs, but if you do five minutes of math you’ll realize that you save bigtime in the long run. If you’re looking for batteries, whether AGM or lithium, here is a code to save you some cash. It is good for 5% off sitewide at Expert Power (and it never expires). Code: AWTY
How A Lithium Solar Battery Bank Saves Money & Time
Lithium costs more on the front end. But if you do five minutes of math, you’ll see that going lithium saves a lot in the long run. Here’s why:
- As a rule of thumb AGMs batteries should only be discharged to 50% in order to increase their lifespan. So in order to have 500Ah of safely accessible energy, you’d need 10 AGM batteries.
- 10 100ah AGM batteries = around $1800 depending on the brand you go for.
- AGMs have a short lifespan compared to lithium batteries. In our case, we had three UPG UB121000 AGM batteries. When these particular batteries are being fully discharged at 77°F (25°C) for the first ~150 cycles, the batteries will operate almost without a loss of capacity. However, the capacity will drop to 50% of nominal capacity after a total of ~250 cycles. And when these batteries are discharged down to 50% of nominal capacity at 77°F (25°C), you could get between 350-400 cycles without a loss of capacity. After 400-550 cycles capacity will drop down to 50% of nominal capacity.
- In an application like ours (living full-time off grid and cycling our batteries on a daily basis), the realistic lifespan for our AGM battery bank is about 2 years.
- So that’s an estimated ~$9,000 in batteries over 10+ years.
- Alternatively, Expert Power lithium batteries are rated for 2500 cycles with 100% depth of discharge and 7000 cycles at 50% depth of discharge at 77°F (25°C).
- 5 lithium batteries = $3500 ($3200 if you use our Expert Power discount code)
- Expert Power lithium batteries have a lifespan of about 10 years or 2500-7000 charge cycles depending on the DOD.
- So that’s an estimated $3200 in batteries over 10+ years.
- ~$3200 vs ~$9000 over 10+ years. The difference is clear. Plus, just think of the space and weight of 10 AGM batteries!
Skoolie Solar System Wiring Diagram
This is the new wiring diagram of our skoolie solar system after completing new upgrades (not shown in the video above). Soon we’ll upload a new video tutorial showing the entire process of installing the new upgrades as illustrated in the wiring diagram below. (stay tuned!)
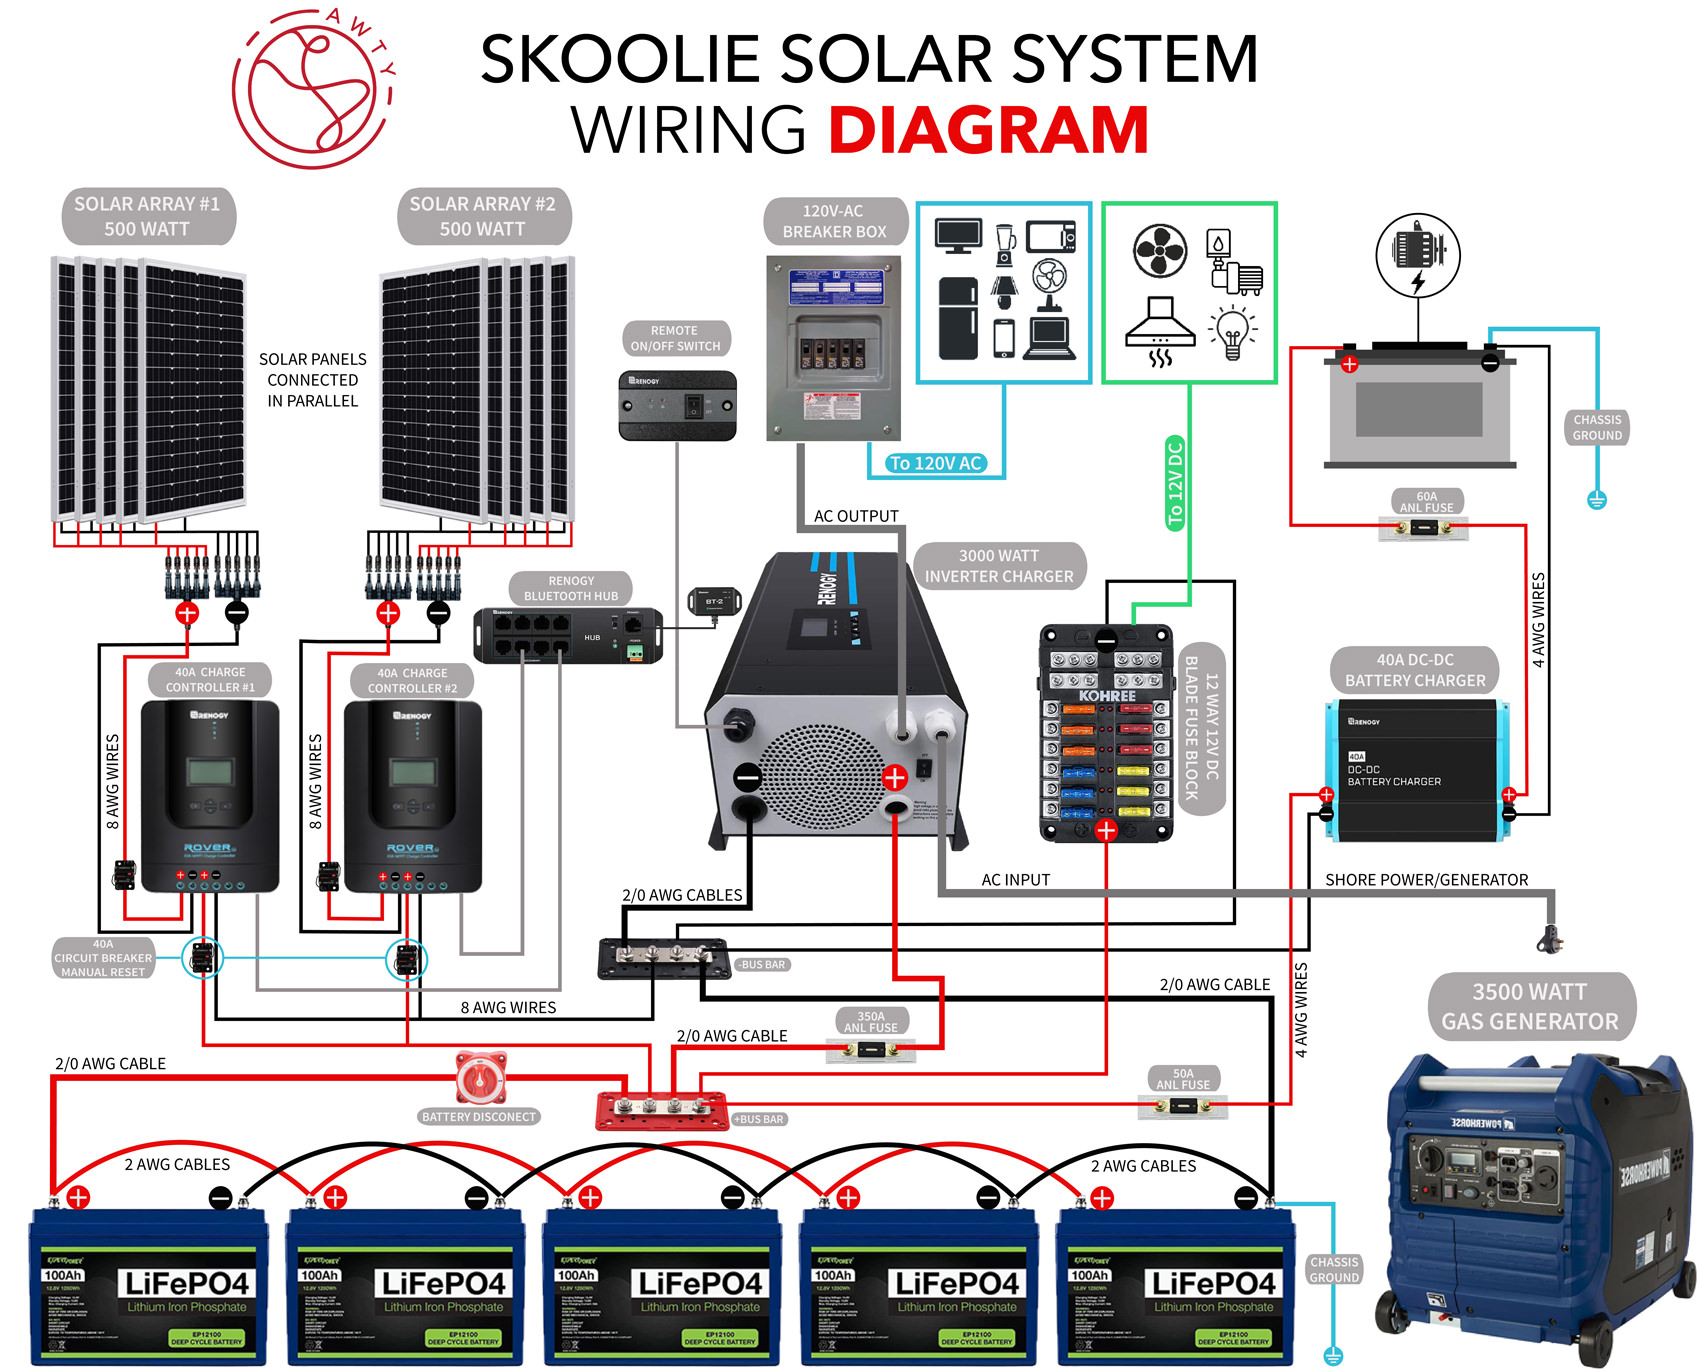
Step 1: Connect all the wires to the inverter.
Before Starting: Have our tutorial video and solar wiring diagram on hand as you follow these steps. They will help everything make sense!
- Connect the battery cables to the terminal of the inverter. Make sure the inverter switch is turned off before connecting any wires. Make sure to match the polarity (negative to negative and positive to positive).
- Next connect the shore power input cable. We used a 30 Amp 10 AWG cable. If you are using a different inverter, you should follow the installation instructions that come with that particular unit.
- Connect the output cable that goes to the 120AC breaker box. We used a 30 Amp 10 AWG cable. This step wasn’t shown in the video. For this connection, you should follow the instructions on the manual of the particular unit you are installing.
- Connect the battery temperature sensor (this is not needed if you are connecting lithium batteries with BMS). Connect the remote start switch (if your inverter model comes with it).
- Install the ANL fuse holder with the 300A fuse. The positive lead from the inverter charger to the positive terminal of the battery bank needs a 300A fuse. To make this connection, we used a 1ft 2/0 AWG cable and a 3ft 2/0 AWG cable to connect to each end of the fuse holder.
Step 2: Install the charge controller.
- Install the charge controller in an open and well-ventilated area.
- IMPORTANT: Never install solar panels under load to the charge controller before you connect your charge controller to the battery bank
- Connect the 10 AWG negative and positive wires to the Bat – and Bat + receptacles on the charge controller. These are the wires that connect the charge controller to the battery bank (make sure to match the polarity).
- The positive lead needs a 40A fuse. In the video, we used a 10AWG fuse holder with a 40A fuse, but later we upgraded to a 40A inline circuit breaker reset fuse. Either one will work well. If you use the fuse holder, make sure you secure the connection very well between the fuse holder and the positive wire that goes to the battery bank. You can make this connection using a butt splice and a crimping tool (make sure the butt splice matches the wire gauge).
- Connect the BT-1 Module (optional). This is the device that will help you to remotely monitor the status of your battery bank using the Renogy app.
Step 3: Connect the inverter and charger controller to the battery bank.
Our battery bank is connected in parallel (positive to positive and negative to negative).
- Connect the charge controller and inverter negative cables to the negative terminal of the battery bank.
- Connect the charge controller and inverter positive cables to the positive terminal of the battery bank.
- Connect the solar panel array to the charge controller. Connect the negative and positive wires to the Bat – and Bat + receptacles on the charge controller (make sure to match the polarity).
- Turn the inverter on and you should be ready to go!
If you have any questions about all these steps, shoot us an email! We’re usually out painting a wall somewhere. Or hunched over our computers in post-production.
Wherever we are, we’ll take time to help you out. Our email: [email protected]
<< Back to the Skoolie Conversion Ultimate Guide Homepage

So you’re building a skoolie, huh?
We feel your pain, my friend! We also know how good it feels to finally make a dream reality.
Our skoolie took 9 months and $28,000 to complete. We documented the entire build and are slowly building a series of guides on every step of the bus conversion process.
We spent a crap ton of time figuring out how to do this and that. We also could have saved a few bucks along the way. We hope our tutorials help save you some time and money!
Our TOP 5 Bus Conversion Tools & Materials:
- 5-in-1 Painters Tool (you will use this a MILLION times)
- Impact Driver & Drill Combo Kit (there won’t be a day you won’t use this)
- 100% Silicone (buy in bulk to save a LOT of money!)
- Angle Grinder (get used to using this ALL the time!)
- Table Saw (it will be nearly impossible to complete your conversion without this. It’s WORTH the investment!)
This page contains product affiliate links. We may receive a commission if you make a purchase after clicking on one of these links.