There are different options for sub-floor insulation in skoolies. In our research, we saw school bus conversions using foam board insulation, fiberglass insulation, spray foam, you name it. We chose rigid foam board insulation for a few reasons:
- We couldn’t afford doing the whole bus with spray foam.
- Using fiberglass would mean building a grid of furring strips along the floor. This would sacrifice more headroom than just a 1/2 inch foam board + 1/2 inch plywood.
There are a few things we wish we’d done differently. Not because we think we did something wrong, we think we just went a little overboard. First we’ll lead you through what we did, then tell what we think we could have done differently!
Required Tools & Materials for Insulation
- Foam board insulation (we chose 1/2 inch GAF with an R-Value of 3.6)
- Utility knife
- Yardstick
- Loctite PL Premium Fast Grab
- Prep All
- Aluminum tape
- Something to weigh the board down – sandbags work great
Full disclosure guys, some of these are affiliate links, so we get a commission if you buy something from the list. As an Amazon Associate we earn from qualifying purchases. Not much, but something. This is really important: we only link to tools and materials we actually used and highly recommend. We do these guides completely for free, so these links are the only way we get a little something back (except for the satisfaction of knowing we helped you build your dream skoolie, of course!)
Don’t have Amazon Prime yet? Here’s a link for 30 days free.
Step 1 – Cut The Panels to Size
This is like happy jigsaw time! Schools buses come in different sizes, some with wheel wells and some not. You’ll have to cut your foam board to match the dimensions of your floor.
Step 2 – Prep the Floor and Foam Panels
Before using Loctite, it’s best to make sure your surface is completely free from dust and grease. We used Prep All. Apply the Prep All in a very thin layer, then wipe off.
Step 3 – Apply Loctite (about 1 tube per 2 sheets of foam board)
- Apply the loctite (we did it in blobs, but we suppose squiggly lines would work as well)
- Also apply a line of Loctite along the edge where the floor meets the wall (we wish we had used 100% silicone here instead)
- Use extra pieces of foam board or wooden boards to walk over the foam board to ‘squish out’ the loctite
- Weigh down the foam board with sandbags or something else really heavy (we used weightlifting weights, and this wasn’t heavy enough)
Step 4 – Tape the Seams
Use the aluminum tape to seal off the seams between the foam board pieces. We used this.
Required Tools & Equipment for Subfloor
- Plywood (we used pressure treated, 1/2 plywood) – do not store this sitting on its side for too long or it will warp
- 1.5 inch stainless steel, self tapping screws (about 8 per sheet of plywood)
- Table saw
- Router
- Loctite PL Premium Fastgrab
Step 1 – Cut the Plywood
Cut the plywood with the table saw to the width of the bus. Cut it so that both short edges are flush with the lower wall panel. Why? See Step 2.
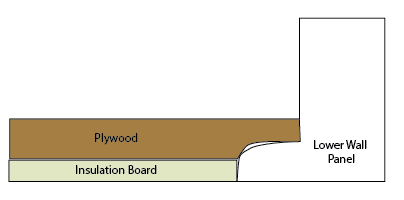
Step 2 – Create ‘Shelf’ on Short Edges
When we put down the 1/2″ foam board, we noticed that there is a slight lip on the edge of the floor where the lower panel juts out like so:
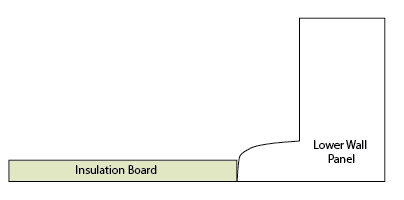
So we used a router to create a ‘shelf’ at each short edge of the plywood so that the plywood can sit flush with the lower panel. Like so:
Step 3 – Apply Loctite
We applied about 1 tube per 1.5 plywood sheets, this time in a squiggly pattern.
Step 4 – Screw Everything Down!
Finally, we secured both plywood and insulation board by sending stainless steel screws through to the metal bottom of the bus. About 8 per plywood section. First drill a hole with a drill bit, then send down a self-tapper with the impact driver. There were a few spots where neither the drill or self-tapper would go through (we were hitting the chassis), so we plugged those holes with more Loctite.
So that is what we did! Now here’s what we may have done differently:
- Using all of that Loctite may have been us going overboard a bit (and that stuff is expensive. so…). As the plywood dries, it warps here and there, and it pulled up in some areas even with the Loctite. So we are thinking, it might have been just as well to use the stainless steel screws and that’s it. Maybe the Loctite would have worked better if we have weighed everything down with lots of sandbags to get enough weight to really force that clean adhesion.
- When putting down the insulation, we applied a long line of Loctite where the floor meets the wall. We wish we had used 100% silicone here, as that was what originally was sealing that seam and silicone just seems more durable to us over the long-term.
- FYI some skoolie conversions only use an adhesive to bond their insulation to the floor and then the plywood to the insulation. We have NO idea how this works for them, as our plywood has warped here and there over time. It especially likes to expand and contract depending on the weather. We know if we had only used Loctite and no screws, we’d have all sorts of issues with the subfloor just popping right up. We highly recommend sending screws through, and then you can always re-seal those holes from below (going under the bus and putting some silicone around the screw ends, or spraying a waterproof sealant).
Next up – removing and resealing those windows!
<< Back to the Skoolie Conversion Ultimate Guide Homepage

So you’re building a skoolie, huh?
We feel your pain, my friend! We also know how good it feels to finally make a dream reality.
Our skoolie took 9 months and $28,000 to complete. We documented the entire build and are slowly building a series of guides on every step of the bus conversion process.
We spent a crap ton of time figuring out how to do this and that. We also could have saved a few bucks along the way. We hope our tutorials help save you some time and money!
Our TOP 5 Bus Conversion Tools & Materials:
- 5-in-1 Painters Tool (you will use this a MILLION times)
- Impact Driver & Drill Combo Kit (there won’t be a day you won’t use this)
- 100% Silicone (buy in bulk to save a LOT of money!)
- Angle Grinder (get used to using this ALL the time!)
- Table Saw (it will be nearly impossible to complete your conversion without this. It’s WORTH the investment!)
This page contains product affiliate links. We may receive a commission if you make a purchase after clicking on one of these links.