You’ve already worked a ton on your skoolie, and now it’s time to install a skoolie propane tank. But what size tank? And should you use a mounted tank or those replaceable 20lb tanks you can get anywhere. These are big questions.
We chose a mountable propane tank for our skoolie. Before we get into how we installed it, we’ll go into a few of those big questions you undoubtedly have. Is it worth it to buy and mount a tank? Would it be easy to find propane refill stations? How much propane will I even use every month?
So first. For us, it was well worth $450 for a mountable propane tank because:
- We have 4 appliances (fridge, stove, water heater, space heater) that use propane. We would run through the 20lbs tanks faster, and changing them out all the time would get really old, really quick.
- It felt safer to have a tank specially made for mounting underneath RVs, rather than mounting replaceable 20lb tanks via brackets. Those brackets would feel flimsy compared to the heavy duty, super-secure way we mounted this tank. Also, as mentioned, the tank is designed for road travel, so safety when it comes to bumps and vibration is built into its design. It also has a fill gauge so we can monitor where we’re at and not have to rely on just ‘running out’ to know when we need to get more propane. When you have a 35ft rig, “just going to get a replacement tank” translates to a real pain in the butt. We like knowing exactly how much propane we have left so we can plan accordingly.
- Using replaceable tanks would require re-connecting hoses every time the tank was replaced. That opens up the opportunity for thread wear, leaks, etc.
Now you’re probably wondering which tank we got.
We got the Armebe 12.2 RV Propane Tank. We are happy with it, but we do wish we had gotten a bigger tank. That brings us to the next question you inevitably have…
How much propane will I use in a month, and how much will it cost?
So here are our numbers.
- We have a 12.2 gallon tank.
- BUT! These tanks can only be filled to 75%. For safety. Which only gives us about 9.15 gallons to work with on each fill.
- We have four appliances running off propane:
- the absorption fridge (running all the time, except when we’re plugged into the grid)
- the stove (used extensively three times a day – Jose loves to cook)
- the water heater (used for ~20 mins every 2 days)
- the space heater (running for ~4hrs per day if we’re in really cold weather)
- We refill the tank every 2-3 weeks.
- This basically depends on the weather (if it’s colder, we run the space heater). And it depends on access to the grid (if we’re plugged in, the fridge can run on electric and that saves propane.) We’re always pretty amazed by how much we can cook, shower, and heat the space without that gauge needle going down too fast. If we’re in warm weather and never use the space heater, the propane can last us 3 weeks. If we’re plugged into the grid and in warm weather, we can stretch it a month if we don’t have to shower every day.
- We pay $20-$30 every time we fill the tank, depending on propane prices where we are. We’ve never paid more than $30.
SO. In summary, we can go for quite a while on 9.15 gallons, even in cold weather with a space heater going. So getting a 12.2 gallon tank wasn’t a horrible thing. We just wish we would have gotten a bigger one because we’d probably only have to fill up every 2 months instead of every 2-3 weeks.
Is it easy to find propane fill stations?
Yes. Very easy.
- Most Pilot Flying J Travel Stops have RV refill stations.
- Every city and almost every town (even small, small towns) have a propane supplier. Two easy ways to find them:
- Search “propane” on Google Maps and you’ll find a list. Call and ask if they refill RV propane tanks.
- Download the iOverlander app. It sometimes shows propane refill stations (and lots of amazing places to camp and free overnight park as well!)
- Now keep in mind, this has been our experience in the US and Mexico. Check back with us in a few years about Central and South America! It will probably be just the same, though.
SO! If after all that, you’ve decided you want to do a mounted skoolie propane tank, here is how we installed ours. Keep in mind, this really only applies for the brand of tank that we got, it was built and designed to be mounted on the underside of an RV or food truck.
Tools & Materials Required for Mounting a Skoolie Propane Tank:
- Armebe 12.2 RV Propane Tank
- Two steel or brass (we used brass) plates. Ours measure about 8 x 8 in and about 1/2 inch thick.
- A friend with a drilling machine powerful enough to drill holes in these plates.
- 12 stainless steel bolts (at least 1/2 inch diameter and at least 2 inches long) with washers and nylon lock nuts. You must get lock nuts because the serious vibration your skoolie will experience could easily jiggle loose regular nuts.
- A heavy duty power drill with a drill bit to make holes large enough for your bolts.
- Two socket wrenches
- Two key wrenches
- 4 clamps
- Something to cushion your back when you’re under the bus. You’ll be under there working for a while.
Full disclosure guys, some of these are affiliate links, so we get a commission if you buy something from the list. As an Amazon Associate we earn from qualifying purchases. Not much, but something. This is really important: we only link to tools and materials we actually used and highly recommend. We do these guides completely for free, so these links are the only way we get a little something back (except for the satisfaction of knowing we helped you build your dream skoolie, of course!)
Don’t have Amazon Prime yet? Here’s a link for 30 days free.
Step 1 – Drill six holes in the metal plates
- The idea here is that each metal plate will fasten to two of the metal beams under the bus. Like this:
- So you need to determine the position of your tank, and then measure exactly where you will fasten the two plates to the beams. When you’ve determined this, mark on the plates where the holes will be drilled. You’ll also need to figure out exactly where the holes mounting the tank to the plates will go. The best way to determine the location of every single hole is to clamp the plates to the beams and work carefully with a friend to hold the tank up in place. Then take it down and take measurements between the mounting brackets built into the tank, making sure it matches the measurement between the marked holes on the plates. In essence, you have to do a lot of checking and double-checking and triple-checking, to make sure that when you drill those six holes, they match up with the beams and the mounting holes on the propane tank.
- When you are absolutely sure about the position of the holes, drill away. These metal plates need to be SOLID and HEAVY DUTY, so you’re most likely going to need a friend who has a heavy duty drill for metal work.
Step 2 – Fasten plates to the tank (not too tight)
Now fasten the plates to the tank, securely but not extremely tight, like this:

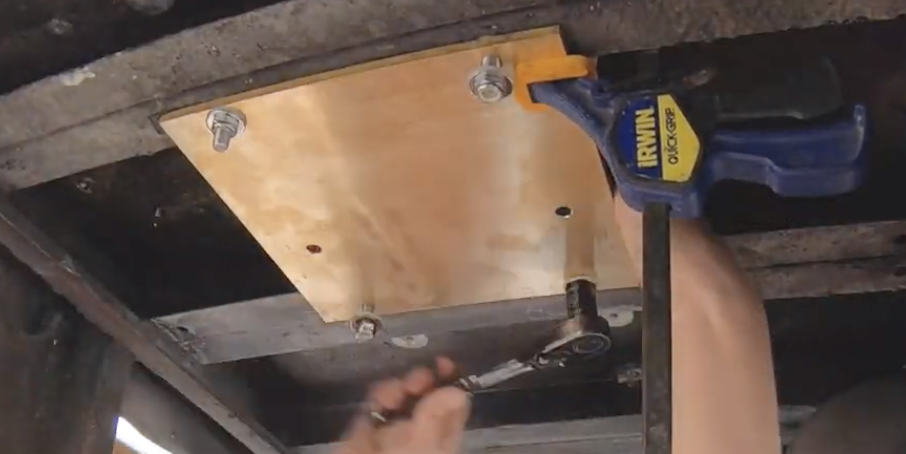
Step 3 – Clamp the tank in place
- Lift the tank up and hold it exactly in the place it is going to be mounted (every hole in the plate should match up to a solid section of beam), and clamp it FIRMLY into place.
- Now carefully UNMOUNT the tank, leaving the plates in place, making sure not to move them from their position.
Step 4 – Drill holes in the beams
Drill directly through the plate holes into the beams. This will ensure that the holes on the plates and the holes on the beams perfectly match up.
Step 5 – Fasten the plates to the beams
- Slip the bolts through the beam/plate hole (don’t forget a washer up top), securing with a washer and lock nut from underneath. You’ll need to hold the top of the bolt stead with a key wrench while tightening the bolt from below with a socket wrench. Do not tighten the nuts up completely yet.
- Tip: if you accidentally mis-thread a nut, don’t force it! You’ll end up snapping the bolt completely. If the nut starts to feel wrong going up, stop and come back down, then start over being careful to thread it correctly!
- After all the bolts are in with the nuts correctly in place, tighten them all up.
Step 6 – Mount that tank!
- Drop your four remaining bolts through the plates from the top down (don’t forget the washer up top).
- Set the washers in place on the underside of the plate.
- One person hold the tank in place while the other attaches the lock nuts. Remember to carefully thread them, and don’t overly tighten at first.
- When all four nuts are in place, tighten them up.
Congratulations!! You have a mounted propane tank that is not going anywhere.
I bet your final question is…how did we run the propane plumbing? We paid professionals for that because we didn’t want to, you know, blow up the bus. No, in all seriousness, here is the reason we chose to contract this job out (just like we contracted out for our electrical):
Some skoolie setups are fine with DIY propane plumbing. Ours wasn’t. We have four appliances that require propane, so this meant we would need a dual regulator and a four way manifold. It would be one thing to work this out and learn how to do propane plumbing on a house that stands still. But this is a bus that will do some serious bumping and clunking down some seriously rugged roads. It’s worth the peace of mind to pay a professional to install a safe, heavy duty system.
Our propane plumbing was installed by Forever Propane, a company in South Florida, for about $1300 for the whole deal…materials, installation, everything.
What we did do was provide a very clear road map for the propane technicians to follow. We created this document, which explained exactly what appliances we have, their propane needs, as well as their locations.
<< Back to the Skoolie Conversion Ultimate Guide Homepage

So you’re building a skoolie, huh?
We feel your pain, my friend! We also know how good it feels to finally make a dream reality.
Our skoolie took 9 months and $28,000 to complete. We documented the entire build and are slowly building a series of guides on every step of the bus conversion process.
We spent a crap ton of time figuring out how to do this and that. We also could have saved a few bucks along the way. We hope our tutorials help save you some time and money!
Our TOP 5 Bus Conversion Tools & Materials:
- 5-in-1 Painters Tool (you will use this a MILLION times)
- Impact Driver & Drill Combo Kit (there won’t be a day you won’t use this)
- 100% Silicone (buy in bulk to save a LOT of money!)
- Angle Grinder (get used to using this ALL the time!)
- Table Saw (it will be nearly impossible to complete your conversion without this. It’s WORTH the investment!)
This page contains product affiliate links. We may receive a commission if you make a purchase after clicking on one of these links.